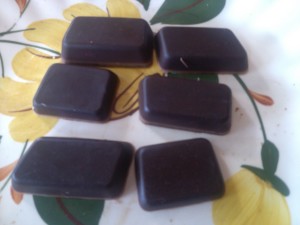
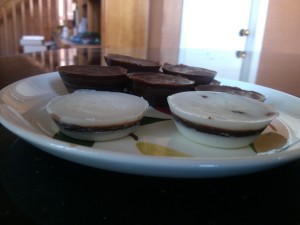
St. Patrick’s Day is tomorrow so I think it only fitting to share one of my favorite desserts which I’ve never considered Irish before, but I’ve been informed by my non-Irish colleagues who celebrate St. Patrick’s Day with green beer that it is!
My take on the peppermint patty is sugar and dairy-free, but still full of chocolate-mint goodness.
So why do us Americans celebrate St. Patrick’s Day with peppermint patties?
Peppermint is green and we celebrate with all things green. After all, Ireland is known as the Emerald Isle.
Mint is an herb relished in Ireland. Garden peas with fresh mint is commonly enjoyed as a Christmas dish in Ireland and mint is often enjoyed with potatoes, pudding, combined with sugar and sprinkled on pineapple (as though pineapple wasn’t sweet enough) and of course just drank as tea. So therefore adding mint to anything makes the dish automatically Irish (and the consumer Irish to, obviously).
In the US we like to shorten St. Patrick’s Day to be St. Patty’s Day and therefore peppermint patties are quite fitting. Unfortunately, the proper abbreviation is St. Paddy’s Day as Paddy is a version of Patrick and Patty is a version of Patricia as emphatically explained on http://paddynotpatty.com/. Therefore I present you with my Naturally Sweet Coconut Peppermint Paddies(?)!
For the chocolate layer/s:
1 cup melted coconut butter (purchased or home-made)*
2 tablespoons melted coconut oil
1 cup cocoa powder or carob powder (for chocolate free). Use raw cacao to keep it a raw dish.
1 tablespoon of vanilla extract
1 teaspoon sea salt
For the mint layer/s:
½ cup melted coconut butter*
1 tablespoon melted coconut oil
¼ teaspoon peppermint extract
1/8 teaspoon sea salt
1 teaspoon vanilla extract
1/16 teaspoon spirulina or chlorella, optional for green color
*Preparation for store-bought or coconut butter that was made previously and hardened:
Artisana’s coconut butter is probably the most expensive but is raw and organic in a glass jar or you can purchase Let’s Do Organic’s which is not raw and in plastic within a box, but is a more reasonable price and still organic.
Melt the coconut butter and coconut oil in a double-boiler. I don’t have an actual double-boiler, so instead I bring a small sauce pan filled half-way with water to a boil, turn down the pot to low and then I add ingredients into a small glass bowl that fits on top of the pot with the bottom of the glass bowl not touching the bottom of the pan but touching the water.
Add the chocolate or carob and the vanilla extract and sea salt. Whisk or use a hand blender until fully incorporated. Do not overheat the mixture as it will be more likely to separate in your chocolate molds.
*Preparation for home-made coconut butter
I go through coconut butter pretty quickly so I often will make another batch of coconut butter when making chocolates so that I don’t have to go through the process of melting it. Any leftover coconut butter, simply goes to snacking and melting on top of dishes. It will get used… It’s delicious and it lasts so you can always make more! I leave leftover coconut butter out in the cupboard.
To make coconut butter, simply blend in a Vitamix or a Blendtec on low a blender full of loosely filled full-fat shredded coconut (defatted coconut will not work and is a bizarre and wrong creation!) and gently using the tamper, push down regularly until it starts to emulsify and then turn-up the blender slowly eventually reaching full power. Blend on high until it is fully liquefied. 7 cups of shredded coconut will make about 2 cups of coconut butter. Do not use a different blender for this as it will burn it out! If you don’t have a high powered blender, it can be done in a food processor, but I hear it takes about 20 minutes to make because you have to keep shutting down the machine so it doesn’t burn-out. I’ve never tried making it in a food processor. I think it’s possible to add coconut oil into the shredded coconut to make blending/processing easier though the texture will be a little different and chocolates will melt quicker the more coconut oil you use. OR you can buy coconut butter and follow directions from above.
Make sure to pour out and set-aside some of the homemade melted coconut butter for making the peppermint layer—I know it’s tempting to add chocolate to all of the remaining coconut butter!
You can add in the coconut oil while blending the coconut butter to make the coconut butter creation go faster or after making the coconut butter, add in the coconut oil into the blender, it will melt on its own. Add the cocoa powder or chocolate, vanilla and sea salt directly into the blender. Blend completely and pour into a bowl while nice and liquidy as opposed to leaving it in the blender where it will cool and become more challenging to remove.
Continuing on, the same for both:
Taste your chocolate!!!! Or rather, slather yourself in it, swim in it and pretend you will leave some to make your paddies! The coconut butter very well tempers the bitterness of chocolate and in my opinion needs no sweetener added, but if you disagree, by all means, add in a couple tablespoons of honey, maple syrup or coconut nectar, to taste.
Pour half the chocolate into chocolate molds, greased silicone muffin pan liners, greased ice cube trays or a greased sheet pan and place in the freezer for 20 minutes to set. If you plan on making on chocolate being entirely on the outside of the molds or muffin liners, only use 1/3 of the chocolate.
While your chocolate is setting in the freezer, prepare your peppermint layer in the same way that you prepared your chocolate layer. If using firm coconut butter (store-bought or previously made), melt in a double-boiler with the other peppermint layer ingredients. If using still liquid coconut butter reserved from freshly making it, pour it into a bowl and whisk or use a hand immersion blender to incorporate the other ingredients. If it needs to be melted more, put it over a bowl of hot water.
Once the chocolate in the freezer has set, add your layer of peppermint-coconut on top, if you want to chocolate to be on the outside layers, only add the coconut to the middle of the mold. Return to the freezer for 20 minutes.
Re-liquify chocolate if necessary using double boiler. Add remaining chocolate to the top of the coconut layer, making sure to completely cover it and return to the freezer for another 20 minutes to set. If using a sheet pan, after it is set, bring it to room temperature before cutting it into pieces.
The amounts provided are for “regular” peppermint patties/paddies, but you can also make Reverse Peppermint Paddies by preparing more of the peppermint “batter” and using the peppermint layer on the outside instead of the inside. I had to do both of course! I did not use spirulina to color my peppermint layers green, but it is a great, natural option for creating a more traditionally green layer for your chocolates.
If you are interested in learning to cook without recipes and honing your creativity in the kitchen, please join me in Denver for one or more of my cooking classes.


[…] Nourished HealthClick here for the recipe. Ingredients: coconut butter, coconut oil, cocoa powder or carob powder (for chocolate free), […]
[…] Sugar-Free Coconut Peppermint Patties […]
[…] Sugar-Free Coconut Peppermint Patties […]
[…] Sugar-Free Coconut Peppermint Patties […]
[…] Sugar-Free Coconut Peppermint Patties […]
[…] Sugar-Free Coconut Peppermint Patties […]
Top home,Products,Buyer Absolutely thrilled with this blender! It’s powerful, efficient, and handles everything from smoothies to soups with ease. Highly recommend!”